Overview of mold-making and casting techniques and materials
This semester I’m exploring the application of DIY 3D printing technology in the world of sculpture, mold-making and casting. So far it has been a fantastic experience, as I get to spend some time at the campus sculpture studio getting my hands on actual materials and gaining valuable experience in, well, making stuff.
To help me get up to speed and find possible useful uses of 3D printing in mold-making and casting, I felt that it would be a good idea to do some research about all the different techniques I could find. I suppose this means that I’ve developed a love of data from my dabbling in science as an undergrad – something that I think could come in handy for me.
When I’m trying to learn something, I like to follow the KISS approach – Keep It Simple, Stupid. Ask simple questions and look for solid answers. It seemed to me that the first question was pretty obvious:
What is mold-making and casting?
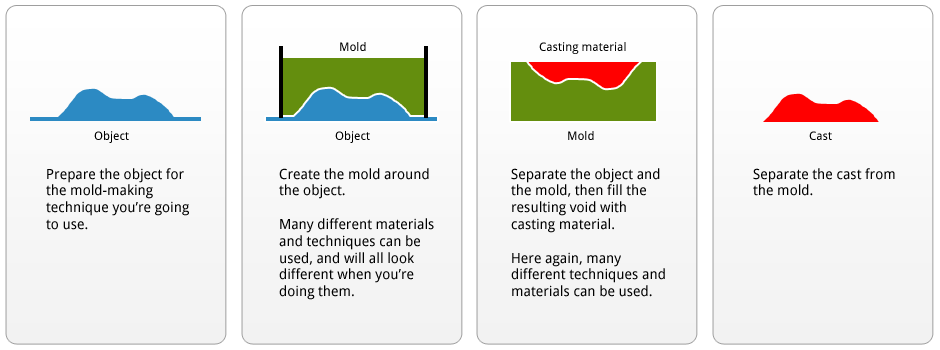
Mold making is the process of creating a hollow, usually rigid vessel around an object (sometimes referred to as the model or pattern). A variety of techniques and materials are used in this process, sometimes out of necessity and sometimes based on the personal experiences and familiarity of the person doing the work. Once a mold is made around an object, the object is removed, leaving a hollow void in the mold exactly the size and shape of the object.
Casting is the process of filling this resulting hollow void in the mold with liquid or molten material, like silicone or bronze, and allowing or causing it to harden. After the material is solid again, you can remove it the mold. Different techniques can result in very different results, from finely detailed to rough and heavy. Every technique has its pros and cons, and works better with some materials than others.
look very, very different, but the overall fundamental process is the same:

Mold-making techniques
A mold is a rigid chunk of material containing a hollow form, into which liquid casting material is poured or applied and allowed (or encouraged) to harden.
- Open face (1-part)
- Two part mold
- Multi-part mold
- Vacuum forming
- Direct 3D-printed ABS / PLA
- CNC milling
- Slump / hump / drape molds
Casting techniques
A cast is the solidified material that comes out of a mold. There are many materials you can use, and many ways you can use them.
- Lost wax [2]
- Direct pour
- Investment casting
- Sand casting
- Compression / press-molding
- Injection molding
- Blow molding
- Transfer molding
- Life casting
- Slipcasting
Materials used in mold-making and casting
There is an absolutely huge list of materials that can be used with the various mold-making and casting techniques out there. It seems to me that if you can get any material in a liquid or molten state, there is a probably a technique you can use to make molds or casts. There are surprisingly few types of materials that are regularly used in professional and industrial work, but that doesn’t mean that other materials are a complete waste of time.
In industrial mold making, thermoplastics like ABS and HDPE are very popular, but require special machinery. In professions like special effects, silicone RTV, fiberglass and resins are very popular. In the fine arts world, materials like bronze, plaster, wax and silicone are favorites. Each of these materials have their pros and cons and work best with certain types of objects and application techniques.
- Wax
- Candle wax
- Thermoplastic
- ShapeLock
- ABS
- PLA
- Plaster
- Foods
- Chocolate
- Water/ice
- Hard candy
- Gelatin (Jell-o)
- Isomalt (sugar substitute)
- Glass
- Metals
- Bismuth
- Aluminum
- Bronze
- Pewter
- Silicone
- Sugru / Oogoo
- RTV
- Plastique
- Resin
- Clays
- Liquid clay (slip)
- Modeling clay
- Ceramics (porcelain, etc.)
Techniques and materials compatibility tables
Here is where things start getting really complicated. So we have some idea of some basic techniques, and we have a list of common materials that we know are used by people to make molds and casts. The trouble comes when you want to try out a technique or a material, or you have an idea that you want to bring to life in some way.
How do you know which materials work with which techniques? It seems to me that the traditional way of finding this out is to do years and years of work, gaining first-hand experience in what works and what doesn’t. Obviously, this can be pretty overwhelming when you have an object or an idea that you want to create in some material.
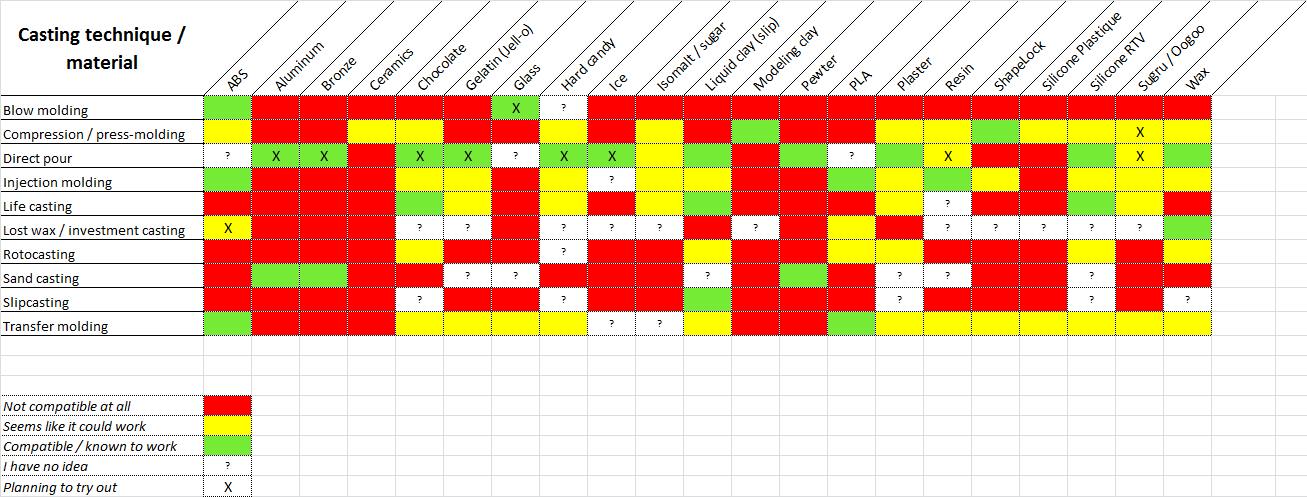
To help me reduce my own feeling of being a little overwhelmed, I’ve tried to create some simple tables documenting the relationship between different techniques and how ‘compatible’ different materials may be with them.

Download the spreadsheet (XLSX)
Download the spreadsheet (XLSX)
How to get started
With all these different techniques and materials, it can be hard to know where to start. However, some materials and techniques are more versatile than others, and can help you do the most number of hands-on experiments as possible without having to buy tons of expensive exotic materials.
Start with plaster – its cheap, versatile and relatively simple to use. In my experience, plaster is the starting point for many mold-making and casting classes and among the cheapest material to use. Check out the compatibility tables above and you’ll notice that plaster is compatible with the highest number of techniques out there, so you can learn a lot from using it! Here’s my suggestion for a road-map to follow in the beginning:
- Make a 1-part mold of an object using plaster. You can either build a box around the object and fill up the box with plaster, or just heap the plaster on until its a good thickness. Try making castings with hot wax, silicone and resin.
- Make a 2-part mold using plaster. Learn about registration marks so you can line up the two halves when putting them back together. Try wax, silicone and resin, or experiment with other materials.
- Make a silicone mold similar to either of the previous two molds. You can get small amounts of silicone in putty form or liquid form online – try to learn about mothermolds and brushing the silicone onto parts to save some cash.
- Pick out a technique and material combination that sounds interesting to you and think about how the materials might interact. If they’re cheap and seem like they’d work together (blow molding with hard candy?), give it a shot!

